Monday, February 25, 2013

Shrimp Tacos with a Tangy Slaw

This is one the best things I've made in awhile. I'm not sure I'll ever be able to do anything else with shrimp.


These tacos are just...magic. I can promise these will be a regular staple in our house. In fact, I would not be the least bit shocked if we ate these again this week. THAT GOOD.

These are exploding with flavor, and this slaw that I sort of...made up and threw together ended up being perfect. The original shrimp recipe suggested the shrimp would be crispy, and they weren't, but the flour help all the seasoning stay on the shrimp, which made them so delicious.

I love when that happens.

Here's what you need (recipe for shrimp adapted from How Sweet Eats)...

For shrimp/tacos:

1 lb of peeled and deveined shrimp (I peeled my own)
1 tsp chili powder
1 tsp cumin
1 tsp salt
1 tsp pepper
1 tsp garlic powder
1/4 cup flour
Tortillas
Reduced fat sour cream

For slaw:

1 cup of pre mixed slaw/cabbage
1/4 cup of rice vinegar
1 tbsp canola oil
1/2 tsp salt
1/2 tsp pepper
1 jalapeno, diced
1/2 red onion, chopped
1 tbsp sugar

For the slaw, mix all the ingredients together in a bowl and stir well to combine. This tastes best if you refrigerate it for a few hours before eating.


For shrimp:

1. Make sure your shrimp are patted dry. In one bowl, put all your seasonings (chili powder, cumin, garlic powder, salt, and pepper). In another bowl, put your flour.

2. One by one, dip your shrimp in the seasoning mix so it's well covered, then in the flour.


3. In a large skillet, saute the shrimp, about 3 minutes on each side or until they are pink. Remove and drain on a paper towel.


4. We used corn tortillas, but I think next time I want to use flour. Spread on sour cream (if desired - Justin also put a little sriracha on his), then shrimp, then slaw. Enjoy!


I've said this so many times now, but these were just so good.


And SO easy! These came together really quickly. Great weeknight meal. And healthy!

I'm going to stop saying how much I loved these. Just go make them.

Oh, and follow exercise blog! I need all the support I can get for the next 10 weeks :) http://gotrainingwithbeth.blogspot.com

Friday, February 22, 2013

Justin's Turkey Chili

I highly recommend obtaining a fiance who cooks. Especially in the winter. 


Whenever it gets cold, I BEG fiance to make this for me. Even when it's not cold, I STILL beg fiance to make this for me because it is SO good.

It's been a disgusting cold in North Carolina. It's really cold, but not cold enough to snow, so it's just really cold rain. I swear it's slightly warmer when it snows. Either that, or I just find it more tolerable because snow is not as gross as freezing cold rain.

Either way, this dinner was much needed this week. Don't let the long list of ingredients phase you - you literally just throw it all in a pot.

Here's what you need (adapted from Rachel Ray)...

2 cups of frozen corn
5-7 cloves of garlic, minced
1 red bell pepper, chopped
1 orange bell pepper, chopped
1 large yellow onion, diced
3 stalks of celery, chopped
1 cup of chopped carrots
1 1/2 tbsp olive oil
2 lbs lean ground turkey
4-5 tbsp chili powder
2 tbsp grill seasoning blend (any brand works)
1 1/2 tbsp cumin
1 tbsp garlic powder
3 tbsp Worcestershire sauce
2-4 tbsp hot sauce (1/2 Tabasco 1/2 Texas Pete's)*
1 bottle beer (preferably a darker beer)
3/4-1 cup BBQ sauce (Sweet Baby Ray's)
23 oz. canned tomato sauce

Optional toppings: fritos, sour cream, and cheddar cheese

*Use less if you don't want a spicy chili.

Here's what you do...

1. Brown meat and chili powder, grill seasoning blend, cumin, garlic powder, Worcestershire sauce, and hot sauce in a large stockpot on medium-high heat, stirring regularly to break up the meat, until browned. About 10 minutes.


2. Add all your veggies (except corn) and cook for another 15 minutes until veggies are soft, stirring occasionally. 

3. Add beer and cook for another 10 minutes (reducing some of the liquid).


4. Add BBQ sauce, tomato sauce, and corn and allow to simmer for 1-2 hours (until you reach desired thickness), stirring occasionally. 

5. Spoon chili into bowl with desired toppings (I like mine with just some cheddar cheese, but Justin loves his with fritos, sour cream and cheese). Enjoy!


This dish is warm and hearty - perfect for a cold winter night.

Have a great weekend! And don't forget about my exercise blogging - I just finished week 2 today! http://gotrainingwithbeth.blogspot.com

Tuesday, February 19, 2013

Blood Orange Sangria

A little sangria is guaranteed to make your Tuesday better.


People always hate on Mondays. Mondays don't really bother me, but Tuesdays? Ew. The last few semesters my Tuesdays have been my longest days at school, AND when I worked full time Tuesdays were the nights I had to work until 9 p.m.

This? This helps my Tuesday.

Blood oranges are in season (isn't that weird?) and they are my favorite. The sweet/tart combo is the best. And look at that color!


Warning: this isn't the sweetest sangria in the world - it's tart. If you like it sweeter, I would suggest adding some simple syrup or honey. For me, the fruit added the perfect amount of sweet.

Here's what you need (from How Sweet Eats)...

4-5 blood oranges
1 bottle of pinot grigio*
1/3 cup of brandy
1/2 cup of club soda (or sprite if you want more sweetness)
1/2 a container of strawberries, cut into pieces
1/2 an apple cut into pieces
1/2 a container of raspberries

*Again, for a sweeter sangria use something like a Riesling.

Here's what you do...

1. Squeeze the juice out of three oranges into a bowl. I did it by hand. Set aside.

2. Chop your fruit, including your last blood orange.


3. In a large pitcher, combine fruit, blood orange juice, wine, brandy, and club soda. Stir well to combine.


4. You can pour it right away, but I let mine sit overnight and it was WAY better. This gets better with time. Enjoy!!

This was (is) delicious. My Tuesday just got a lot better.

Friday, February 15, 2013

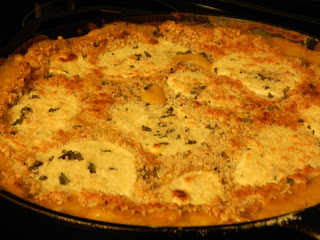
Butternut Squash Lasagna

The other day, I was in serious need of comfort food. This TOTALLY hit the spot.


I'm sort of in need of comfort food now, and I'm tempted to make this again. I had blood drawn today for our life insurance application (because fiance forces me to do things like this because I am an "adult." Pfffft.), and me and blood and needles? Not good. Definitely fainted.

SO, this can be made one of two ways. I made it in an oven safe skillet (purchased at Williams Sonoma). That skillet is seriously one of the BEST kitchen purchases I have ever made. Being able to make everything in one skillet and then just throw it in the oven is WAY too easy.

You can also make this the traditional way you make lasagna - in a baking dish. Totally your call - I promise it will be amazing either way.

Here's what you need (from How Sweet Eats)...


2 cans of butternut squash
6-8 whole wheat lasagna noodles, broken into thirds
3/4 tsp salt
1/4 tsp pepper
1/4 tsp nutmeg
1 yellow onion, diced
2 tbsp fresh chopped sage
1 package ground chicken
2 tbsp unsalted butter
2 tbsp all purpose flour
2 cups low fat milk
1/4 cup of reduced fat cream cheese
1/2 cup of parmesan cheese
Fresh mozzarella, sliced into rounds
Panko bread crumbs

Here's what you do...

1. Preheat oven to 375 degrees.

2. Cook your lasagna noodles according to the package, but shave off 1-2 minutes - they will cook in the oven. Set aside.

3. Pour about 1 1/2 cans of butternut squash into a bowl. Add 1/4 tsp of salt, nutmeg and pepper and mix up. Set aside.


4. In your skillet, saute onion with olive oil and 1/4 tsp of salt until soft, about 3-4 minutes. Add ground chicken and 1 tbsp of sage and cook until chicken is lightly browned, about 6-8 minutes. Set aside chicken mixture in a bowl.


5. Add butter to your skillet and let it melt and then add flour. Mix until combined, then add milk. Stir well until it starts to thicken - about 3-5 minutes.

6. Add cream cheese, parmesan, and a pinch of nutmeg. Stir until everything is melted and creamy.


7. Add your butternut squash to the mix and stir to combine. Then, add chicken mixture and stir again.


8. At this point if you are not using an oven safe skillet, you'll want to start layering in a baking dish. I'd put a bit of sauce (the chicken mixture) in the bottom, then do a layer of noodles, layer of squash/chicken mixture, mozzarella (be sure you slice it thin if you're making the recipe this way), and then repeat until you reach the top.

9. If you ARE using an oven safe skillet, what you do is tuck your noodles strategically in the chicken/squash mixture. I used my spoon, but next time I think I'll use my hands. You want to push some to the bottom and then add more on top with the chicken mixture in between. Hopefully that makes some sense.

10. Add mozzarella rounds on top, then the additional sage, then breadcrumbs.


11. Bake for 25-30 minutes. Remove and let sit for about 10 minutes. Enjoy!


It looks like a weird pizza, but it was SO good. Creamy and delicious, but not the most unhealthy comfort food ever!

Have a fantastic weekend! I'm going to continue recovering from my harrowing experience this morning. Being an adult is hard.

PS: Don't forget to follow my exercise adventures here! Thanks for all the words of support :)

Sunday, February 10, 2013

Exercise Blogging

Hi All!

SO, in addition to my food blogging here, over the next 90 days I'm also blogging for my friend/neighbor Beth! Beth is a personal trainer here in Greensboro, and she is so awesome at what she does. See Beth kicking my butt below:

Photo credit to Go Training with Beth
Here's what I'm doing:

Beth has asked me to try out Jillian Michael's Body Revolution dvd series (can be purchased on Amazon). It's a 90 day series, and Beth wants to see what I think so she can decide whether or not to recommend it to her clients in between their sessions with her. I completed day 2 today, and I will be blogging throughout the 90 days here.

I could not be more excited about this project! In 90 days, I will be approximately 3 weeks away from wedding day, so what better way to get in shape?!

If you're a fan of exercise videos, definitely follow the blog! It's gotrainingwithbeth.blogspot.com.

If you have any questions about Beth and her services, check out her site: www.gotrainingwithbeth.com

Saturday, February 9, 2013

Crockpot Italian Meatballs

I'm a big fan of things that take minimal effort, but still taste delicious. Hence, why my crockpot is probably one of my favorite kitchen appliances.


Anyone familiar with Lansing, Michigan? I found out this week that I have to go to a conference there in March, and while I'm really excited about the opportunity...what is actually IN Michigan? Let's be honest - I'm mostly asking you where I should eat because my days revolve around my meals.

Anyway, I made these for our Super Bowl party, and they were super popular and REALLY easy to make. I served them alone, but these would taste GREAT over pasta. Or on slider buns with some basil? Yum.

Here's what you need (adapted from Food.com)...

1 egg
1/2 tsp salt
1 tsp italian seasoning
1/4 tsp red pepper flakes
4-7 cloves of garlic, minced
1 small yellow onion, diced
2 lbs lean ground beef
1/2 cup dry breadcrumbs
1/3 cup parmesan cheese (plus more for topping)
1 jar of marinara OR homemade sauce)
1/4-1/2 cup red wine*

*This all depends on how your prefer your sauce. If you like a thinner sauce, add more wine. If not, stick with less.

Here's what you do...

1. In a small bowl, mix together egg, salt, italian seasoning, red pepper flakes and garlic.

2. In a larger bowl, combine onion, beef, bread crumbs, and cheese. Add the egg/seasoning mixture and combine everything well with your hands.

3. Next, form small meatballs. I ended up with around 30.


4. In your crockpot, add wine and marinara. Stir well, then add meatballs.

5. Cook on low for 6-7 hours. Enjoy!


Seriously though, tell me what you know about Lansing (yes, I am aware it is the capitol city of Michigan, don't tell me that). I need to start planning my meals - I'm leaving in less than 6 weeks!!!


Sunday, February 3, 2013

Salmon with a Low Cal Dijon Sauce

Happy Super Bowl Sunday! And GO RAVENS!!!!!!!!


Fiance is in a special place right now. He was born and raised in Baltimore, so this game is a BIG. DEAL. We are having people over (I made a dip, crock pot meatballs, and this amazing bread that I will be sharing here soon!) and he is legitimately concerned that people are going to impede on his game watching. He actually set up a "back up" room downstairs in case he feels the noise level upstairs is unacceptable. 

I should get serious points for that, right? He moved a t.v. and everything. Plus, there's already taxidermy on the walls down there (don't get me started), so I should get even more points. I shall use these points...toward Target time. 

ANYWAY, this isn't exactly game day food, but this is definitely easy weeknight dinner food. 

This sauce is SO GOOD. It's full of flavor and about 50 calories per serving. You can either grill your salmon or do it in a pan - tastes great either way. 

Here's what you need (from How Sweet Eats)...

1 lb salmon filet
salt
pepper
olive oil
1/2 tbsp butter
3-4 garlic cloves, minced
2 tbsp fresh sage, chopped
1 shallot, diced
1/4 cup white wine*
3/4 cup low fat evaporated milk
1 1/2 tbsp dijon mustard

*Use a dry white wine. I actually use more than 1/4 cup because I like a thinner sauce, but if you're looking for a thicker, creamier sauce, stick with 1/4 cup.


Here's what you do...

1. . In a pot, add butter, garlic, shallot and sage. Let saute for about 3-5 minutes. 

2. Add your wine. Allow it to bubble and reduce a bit, another 4-5 minutes.


3. Add milk and mustard. Let simmer on low heat while you cook the salmon. You can even remove from the heat and set aside to allow it to thicken.

4. Season your salmon with salt and pepper. Grill or cook in the pan. If cooking in a pan, add olive oil and cook for about 5-6 minutes on each side. Same with the grill, but closer to 4-5 minutes on each side.

5. Pour sauce over salmon and enjoy!


This has become a staple for us. The sauce is SO easy to make. I usually make it on Sunday so we have it throughout the week. 

Happy Game Day!!! I'm ready for a great game and a Ravens win :)