Wednesday, December 26, 2012

Brussels Sprouts Grilled Cheese

Hear me out. 


This holiday season has been a little crazy, but I’m not crazy. Yet.

I’ve been MIA for the last week because Justin and I were in Maryland visiting his family for the holidays. Last Saturday, his amazing family threw me a VERY fun bridal shower. We received a lot of awesome gifts, but the first thing we used when we got home…was the Panini maker.


There’s something about melted cheese on hot crispy bread that I just LOVE. I stumbled over this recipe several weeks ago, and it’s been in the back of my mind. You don't need a panini maker for this - you can make it like regular grilled cheese in a pan.

This. Sandwich. Is. Amazing.


Plus, it’s loaded with brussels sprouts, so it’s totally healthy, right? Right.

Here's what you need (from How Sweet Eats)...

4-5 brussels sprouts, stems removed and chopped
1 clove of garlic, minced
1 tbsp of olive oil
Salt and peper to taste
4-5 thin slices of havarti cheese
Balsamic glaze*
2 slices whole wheat bread

*You can buy a balsamic glaze at just about any grocery store. Find it in the aisle with the oils/vinegars.

Here's what you do...

1. In a small pan, saute garlic, brussels, salt and pepper for about 5-6 minutes or until the brussels are wilted. 


2. If you're not using a panini press, butter one side of each piece of bread. Layer a couple pieces of cheese, then the brussels sprouts. Drizzle with balsamic glaze, then add a couple more piece of cheese, then top with bread.

3. Place under your panini press, or in a pan, and cook until brown (if cooking in a pan, flip so the other side can get brown as well).

4. Remove and enjoy!


These are my new favorite vegetable. Just in time for the New Year...


Friday, December 14, 2012

Pumpkin Snickerdoodles

I'M FREE!!!!!!!!!!! (I feel like I've said this before...)


This has been the most intense semester of law school, but I made it. Monday, I took a 4 hour exam. 4 HOURS! I came home in a complete daze...and started baking cookies. Apparently, when I finish exams my instinct is to bake. Last semester it was bread, this semester, cookies.

These are so delicious. I LOVE a soft cookie, so I'm all about these cookies. And the whole house smelled like Christmas. Win win.

Here's what you need (from My Life as a Mrs)...

1 stick of softened unsalted butter
3/4 cup white sugar
1/3 cup (and a little extra) of unsweetened pumpkin puree
1 egg
1 tsp vanilla extract
2 cups of flour
1/2 tsp baking powder
1/2 tsp cinnamon
1/4 tsp salt

For the rolling sugar:

1/4 cup of sugar
1/2 tsp cinnamon
1/4 tsp ground ginger
1/8 tsp all spice

Combine in a bowl and set aside.


Here's what you do...

1. Preheat oven to 350 and line a baking sheet with parchment paper.

2. In a bowl, combine butter and sugar. Then, add pumpkin, vanilla and the egg mixing to combine.

3. In a separate bowl, combine flour, baking powder, cinnamon and salt. Slowly add the dry mixture to the pumpkin mixture and mix until well combined. Refrigerate for at least 1 hour (this makes the dough easier to handle when you're rolling it).

4. Once thoroughly chilled, roll the dough into small balls and roll them through the sugar/spice mixture. Place on your baking sheet. I ended up with 15 cookies.

5. Finally, dip the bottom of a cup into water and put it in the sugar/spice mixture. Press down on each cookie to flatter it a bit.

6. Bake for 15 minutes and quickly remove - you don't want a crispy cookie. Enjoy!!


These were just what I needed to forget about my last exam. Well, these and a large glass of wine. But wine at 1:30 p.m. is not usually the best plan.

Happy Holidays! I had plans to post a spaghetti squash recipe...but my spaghetti squash rotted. I promise I'll be posting more now that we have a break! Have a wonderful weekend.

Monday, December 3, 2012

Pasta Carbonara

Some girls like chocolate. Me? I like (LOVE) cheese.


When I'm stressed, cheese is my go-to. We are smack in the middle of finals, and all I want is cheese. Because this my blog and I never lie to you, I'll tell you that I sat down at the dining room table this afternoon after final 2 of 4 and just dunked crackers into goat cheese I found in the fridge.

Anyway, I need to find a more functional way to enjoy cheese, so I made this dish last Saturday for some friends who came by for dinner. I had a dish similar to this at a local italian restaurant a few months ago, and I haven't been able to stop thinking about it. I knew there was a way to make it lighter and cheaper, so I did.

I adapted the recipe from the skinny alfredo sauce I made back in February, threw in some grilled chicken, bacon, and peas, and we were set!


Here's what you need...

Sauce:
6-8 cloves of garlic, minced (I used my food processor)
3 tbsp butter
2 tbsp flour
1 1/4-1/2 cup of 2% milk
2-3 tbsp of lowfat cream cheese
2 cups of fresh shred parmesan cheese (reserve 1/2-1/4 cup for topping)
fresh chopped parsley
black pepper to taste

Additional ingredients:

About 1/2 box of whole wheat pasta, cooked and drained
1 cup of frozen peas
5-6 strips of bacon (baked at 350 for 20 minutes - perfect), crumbled
1-2 grilled chicken breasts (we just seasoned with a light dusting of adobo and fresh cracked pepper), cut into chunks
Breadcrumbs

Here's what you do...

1. Preheat oven to 350 degrees.

2. I used my oven safe pan, but you could use a non-oven safe pan and pour it into a dish to bake later. Saute your garlic with your butter for about a minute. Add flour and stir until combined. Then, add milk. Start with 1 cup and add gradually as needed.

3. Let the milk warm up and thicken the sauce - about 5-7 minutes. Add cream cheese, parmesan cheese (don't forget to reserve some for topping), parsley and black pepper. Stir until everything is melted and combined.

4. Add pasta, chicken, peas, and bacon to your pan and stir well to combine. Top with leftover parmesan cheese and breadcrumbs.

5. Bake for 20-30 minutes, or until it's bubbling around the edges and brown on top. Enjoy!!


This turned out SUPER well. Plus, there's peas in it, so it's totally healthy. 

See you on the other side of finals when I'm no longer living on soup and...well, soup. 

Friday, November 23, 2012

Sweet Potato Casserole AND Green Bean Casserole


I know, I know. I'm a day late. Whatever, you should cook Thanksgiving food year round.


These two recipes? Amazing. I made 4 sides this year - butternut squash mac and cheese, Trader Joe's stuffing, and these two recipes. Justin made an amazing turkey, and we were set!

Best part about these two recipes? They are lightened up versions. No cream. Very little butter. Delicious.


It was a busy oven.

Sweet potato casserole (from How Sweet Eats):

2 lbs of sweet potatoes (this was 2 big potatoes for me)
2 tbsp brown sugar
2 tbsp maple syrup
2 tbsp brown butter (see butternut squash recipe for a how to)
1/3 cup lite coconut milk (this does NOT add coconut flavor - just creaminess)
2 tsp vanilla
1/2 tsp cinnamon
1/4 tsp nutmeg
1/4 tsp salt

Crust:

1/2 cup whole, unsalted pecans, chopped
1 1/2 tbsp brown sugar
1/4 cup unsweetened flaked coconut
1/4 cup old-fashioned oats
1 tbsp whole wheat pastry flour
1/2 tsp cinnamon
pinch of nutmeg
pinch of salt
2 tbsp butter, softened
mini marshmallows

Mix everything together with your hands and set aside.

Here's what you do...

1. Preheat oven to 375.

2. Peel and chop your potatoes into pieces and boil for 20-30 minutes, or until soft.

3. Add your potatoes to a bowl and, using a mixer, blend until smooth. Add all other ingredients (except crust) and blend again.

4. Pour into an oven safe bowl, top with crust and then mini marshmallows. Bake for 25 minutes and enjoy!


I was so excited to dig into the sweet potato casserole that I didn't even take a picture of the finished product. But there's a picture of our turkey in the oven!

Green Bean Casserole - here's what you need (from My Life as a Mrs)...

1-1.25 lbs of green beans
8 oz. mushrooms, slice
5-7 cloves of garlic, minced
3 tbsp salted butter
1 tsp salt
1/2 tsp black pepper
3 tbsp flour
dash of cayenne*
1 cup low sodium chicken broth
1 cup half and half
Onion straws (we got ours from Trader Joe's)

*Leave out the cayenne if you don't like a little kick!

Here's what you do...

1. Boil your green beans for 5-7 minutes and immediately transfer to a bowl of ice water to blanch. Drain and set aside.

2. Preheat oven to 350.

3. In a pan, combine butter, mushrooms, salt and pepper. Saute for 5-7 minutes, or until the mushrooms are soft. Add garlic and cayenne and stir for another minute.

4. Add flour and stir for another minute more. It will be a weird chunky looking mixture. Then, add chicken broth and bring to a simmer stirring until the flour is well-combined. Then, add half and half and simmer for another 10 minutes or until thick.

5. Add green beans and about 1 cup of onion straws. Pour into an oven safe dish and top with more onion straws. Bake for 20-25 minutes. Enjoy!

I can't stand mushrooms, but I love them in this dish. This was the hit of the night - I will be offended if you use cream of mushroom soup in the future.


 I hope you all have a very happy Thanksgiving! We are about to jump into finals, so I will be MIA for awhile. I wanted to leave you with this:


1. That is a dog bed.
2. I'm pretty sure normal animals lay on top of the pillow, not under.
3. Should I take this as a sign that I shouldn't have children when my CAT turns out to be this crazy? Just a thought.

Monday, November 5, 2012

Potato Leek Soup

Hi! Remember me? 


Sorry I've been MIA for a few weeks now. We traveled 2 weekends in a row, and while I've been cooking, I have not been posting.

It's starting to get cold here in NC, so I have started making soups like a crazy person. This is one of my all time favorites. I started pulling ideas from various recipes until it ended up being completely my own.

Are you familiar with my friends the leeks? SO good. And lots of health benefits that I could list to you, but you can just look them up if you really care. Summary: they taste good and they are good for you.


Here's what you need...

4 tbsp butter
6-8 cloves of garlic, minced
1 1/2 yellow onions, diced
4 leeks, rinsed and sliced - only the white parts*
3 stalks of celery, diced
15 baby red potatoes, cut into pieces
1/2 tsp pepper
1 tsp white pepper
1 tsp dried thyme
1 tbsp fresh thyme
2 cups low sodium vegetable broth
2 cups low sodium chicken broth**
3/4 cup of half and half

*You MUST rinse your leeks!! They are really dirty. I usually put mine in a bowl full of water and toss them around a few times to make sure they are clean (see below).


**If you want this to be a vegetarian soup, just use vegetable broth!

Here's what you do...

1. In a large stock pot, melt your butter. Saute onion, leeks and celery for about 5-8 minutes, until they soften up a bit. Add garlic for 30 seconds, then add potatoes.


2. Add pepper, white pepper and thyme. Saute spices with everything for another 5-10 minutes.

3. Add your broth. Allow to simmer on low heat for 30-45 minutes, or until all the vegetables are soft.


4. Once your vegetables are soft, use a potato masher to mash everything up in the pot. I like my soup with chunks of potato in it, but this time I tried using my immersion blender to make a smooth soup. I still prefer the chunks, but that's just me!

5. Add half and half and allow to simmer for another 15-20 minutes, or until it's a little bit thicker.

6. Serve with a sprinkle of fresh grated parmesan and a little parsley. Enjoy!!


This soup is PERFECT for the cooler weather, and it's actually fairly good for you. 

Would you all hate me if I posted something non-food related on here? I promise it won't be about my emotions or anything like that.

Promise to be back sooner than 3 weeks!!! Stay warm :)


Monday, October 15, 2012

Butternut Squash Mac and Cheese

I told you I was going to inundate you with fall recipes


This. was. so. good. I made this the other night when our neighbors came over for dinner, and it was FANTASTIC.

I used an oven proof skillet so I could do everything in one pan (except cook the shells), but you can definitely use a non-oven safe pan and transfer to a baking dish.

Also, I bought pre-cut butternut squash. I have wrestled with a butternut squash once and almost chopped my hand off. If you want to slice your own squash...go for it. I enjoy having 2 hands.

Here's what you need (from How Sweet Eats)...

4 cups of uncooked whole wheat medium shells
4-5 cups of uncooked butternut squash, cubed
Olive oil
1/2 tsp salt
1/2 tsp pepper
1/4 tsp nutmeg
1 tbsp fresh chopped sage
3/4 cup of low sodium vegetable stock
1 1/2 cups of milk (I used skim)
1 hunk (usually 8 oz.) of fontina cheese, shredded
1/2 cup of fresh shred parmesan
2 tbsp unsalted brown butter*
Bread crumbs

*Brown butter gives a great flavor to food. In a small saucepan, melt your butter and whisk until you start to see brown bits on the bottom of the pan. Immediately take off the heat, whisk for a few more seconds, then set aside until ready to use.

Here's what you do...

1. Preheat oven to 375 degrees.

2. Boil your pasta according to directions and set aside.

3. In your large oven safe/non-oven safe skillet, saute butternut squash with olive oil, salt, pepper, and nutmeg.


4. Add vegetable stock and cover the pan allowing the squash to simmer for about 15 minutes (make sure it's medium-high heat).

5. Once you have done this, you should be able to mash your butternut squash with a potato masher or fork.


6. Add milk, about 3/4 of the fontina, all of the parmesan, and the fresh sage. Stir until smooth and melted, about 5 minutes.


7. Once smooth, add your brown butter. Then, mix in your shells.

8. Transfer to a separate baking dish if you are not using an oven safe skillet, and top with remaining fontina and cover evenly with bread crumbs.


9. Bake for 20-25 minutes and allow to sit for 10 minutes after removing from the oven. Enjoy!

This had such a great flavor. I honestly don't remember what wine I had that night because I was so focused on this dish. Our neighbors brought over a low sodium tomato soup, which was an excellent side dish.

Make this!! Just don't cut off your hand if you decide to be brave and cut the squash yourself. But honestly, you should just pay the extra $1.50 and save yourself a hospital visit.

This promises to make your Monday better :)

Tuesday, October 9, 2012

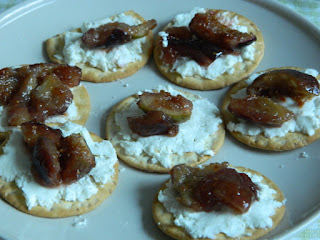
Fig and Goat Cheese Appetizer

This appetizer could fall into two categories: "things that don't look terribly appetizing, but taste awesome," and "things that look a lot more fancy than they really are."


A few weeks ago, my neighbor and friend Beth came by with a couple samples of appetizers she was making for her in-laws. One of the appetizers was figs on a cracker with creme fraiche. I'm not a huge creme fraiche fan, but the figs were AWESOME. As you all know, we have plenty of goat cheese, so...ta da! 


The savory/sweet combo of the figs and goat cheese is so good. I highly recommend making this the next time you volunteer to bring an appetizer to an event or dinner a friend's house. They will be impressed and thing you spent loads of time and/or money on this. And you will have spent barely any time and about $5. 

Here's what you need (thanks, Beth!)...

8-12 figs, cut into fourths
Goat cheese
Cracker of choice
1-1 1/2 tbsp of sugar
1/4 cup of water

Here's what you do...

1. Cut the stems off your figs, cut them into fourths, and put them in a small saucepan. Add water (it shouldn't completely cover the figs - just go up about halfway) and sugar. 


2. Turn heat to high, bring to a boil, then lower the heat and let simmer until the water/sugar/fig mixture is reduced. About 10 minutes. It should look like this:


3. Spread goat cheese on crackers, top with the figs, and enjoy!


Simple, relatively cheap, and really really tasty. 

We had this with a glass of Pinot Grigio from...Costco. 


Costco's brand (Kirkland) makes some GREAT wines, and they are always reasonably priced. Not super dry and a little fruity, it went really well with this appetizer.

Have a great week!

Friday, October 5, 2012

Apple Pie Cakes

Happy Fall!! It officially feels like fall in North Carolina, so get ready for more fall recipes than you can handle. If Justin can find butternut squash in bulk (and I have no doubt he can), we will be buying it.


I was craving something sweet the other night, but I didn't want to go overboard. My birthday is this weekend, and I know cake will be happening, so I didn't want to make anything super sugary/bad for me. So, these happened.

I know, they are adorable (I find it weird when people describe food like this, but really, look at those hearts). I bought those ramekins online a few weeks ago and finally found a reason for them. If you don't have ramekins, just use a small baking dish.


This recipe is small - it does not yield a lot of cake, which is exactly what I wanted. I just wanted one small serving. BUT if you want a big cake, double or even triple it and put it in a bigger baking dish.

Here's what you need (from How Sweet Eats):

1/4 cup butter, melted
1/4 cup brown sugar
1 egg
2 teaspoons of vanilla
1/3 cup of plain greek yogurt (I used fat free Fage)
1/3 cup of whole wheat pastry flour
1/4 cup of all purpose flour
1 tsp baking powder
1/2 tsp cinnamon
pinch of ginger and nutmeg
1 apple, peeled and cut into small pieces

For the brown sugar topping:

1 tbsp brown sugar
1/2 tbsp flour
1/4 tsp cinnamon
2 tsp melted butter
pinch of salt

Combine and sprinkle over batter just before baking.


Here's what you do...

1. Preheat oven to 350 degrees.

2. Combine butter, brown sugar, egg, vanilla and greek yogurt in a bowl and stir to combine. You don't even need a hand mixer - just a spatula!

3. In another bowl, combine the flours, baking soda, cinnamon, ginger and nutmeg and mix to combine.

4. Add your dry ingredients to your batter and stir again to combine. Then, fold in your apple pieces. Sprinkle your brown sugar topping on top.

5. Pour into individual ramekins (it made 3 for me), or into a baking dish of choice. Bake for 25-30 minutes, or until a toothpick comes out of the center clean.

6. Allow to cool. If you wish, add a glaze on top. You just need 3 tbsp of powdered sugar combine with a little splash (emphasis on little) of milk. Pour on top of your cake. Enjoy!!


These satisfied my craving for something sweet without being overly sweet. And I didn't feel guilty afterward because it was a small portion! Win win.

*I should note - I made a comment in my last post about being healthy not being fun. I simply meant that it is sometimes a struggle to be healthy. When you crave a bacon cheeseburger, but know you should eat a salad instead, it's not always as satisfying. BUT, I am always satisfied by the way I feel when I eat healthy.

Have a wonderful weekend everyone!! Now that I'm looking at that picture I'm thinking some vanilla ice cream would have been a perfect addition...

Saturday, September 29, 2012

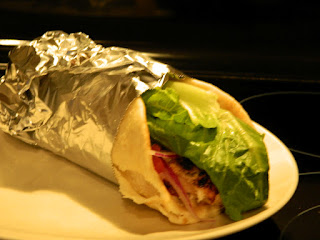
Greek Chicken Pita/Salad with homemade Tzatziki

Last Sunday, one of my dreams came true: I attended my first food truck festival.


For those who are not aware, food trucks have become a bit of a phenomenon over the last few years, and they have become gourmet - I'm not talking about funnel cakes and hot dogs. We're talking about delicious gourmet food...from a food truck.

ANYway, my favorite thing I had at the food truck festival was from a greek food truck. They served a grilled chicken pita with this amazing tzatziki, and I decided to try and recreate it.

There are 2 options - 1. the pita or 2. a salad. I'm attempting to avoid "bad" carbs (is there really such a thing?) as my wedding dress is en route and I have every intention of looking fabulous in it, so a salad was the way to go.


Being healthy is no fun what so ever, in case you were wondering.

Here's what you need (adapted from Skinny Taste)...

Marinade:
2 boneless skinless chicken breasts
3 tbsp fresh lemon juice
1 1/2 tsp dried oregano
3 garlic cloves, diced (less if you're not a big garlic fan)
salt and pepper to taste

Mix all the ingredients together, pour in a ziplock bag with the chicken and allow to marinate at least 1-2 hours, preferably overnight.

Tzatziki (also adapted from Skinny Taste):

1/4 cup of fat free yogurt (I used Fage - of course we get it at Costco)
1 small cucumber, peeled
1-2 garlic cloves
a squeeze of fresh lemon juice
1 tbsp fresh dill
1 tbsp fresh chives
salt/pepper to taste

Slice your cucumber in half and spoon out the seeds. Throw your cucumber into a food processor and then drain. Get as much liquid out as possible. Place dry cucumber back in the food processor with the yogurt, garlic, lemon juice, dill, chives, salt and pepper. Pulse until blended. Refrigerate until ready to use.


For the salad:

Romaine lettuce
Tomatoes
Red onion
Feta cheese (I used reduced fat)
Lemon
Olive oil

Throw all ingredients into a bowl, top with grilled chicken and lemon/olive oil for dressing. I also had a side of tzatziki for dipping my chicken.


For the pita:

1 pita (you can find these at most grocery stores)
Romaine lettuce
Tomato
Red Onion
Grilled Chicken

1. I suggest laying your pita half on a sheet of aluminum foil and half off. Wrapping it in the foil when you're done helps to keep everything inside your pita.


2. Layer chicken, onion, tzatziki, lettuce and tomato on your pita. Top with additional tzatziki if desired, wrap up, and enjoy!


These turned out really well, and I'm guessing this tzatziki is a lot more healthy than the one at the food truck.

Now, for the "what I was drinking" segment of the program:


We chose a 2010 unoaked Chardonnay from Charlottesville, VA. Charlottesville wines are hard to find outside Charlottesville, however, a 2010 unoaked Chardonnay from Napa would absolutely be comparable. And equally as delicious.

Enjoy your weekend!

Monday, September 24, 2012

Pumpkin Chocolate Chip Cookies

IT'S FALL!!!!!

Hello, amazing camera. Thank you, amazing fiance. 

I didn’t really know what fall was until we moved to North Carolina, but I really truly love it. The slightly cooler air, the clear sky…everything feels so good!

I had to bake for an event at school this week, so I decided I wanted my house to smell like fall. And these cookies nailed it.

They have the slightest pumpkin flavor due to the pumpkin butter, and they are crisp on the outside and a little chewy on the inside. Perfection. 

Here's what you need (from How Sweet Eats):


1 1/2 sticks melted, cooled butter
1 cup brown sugar
1/2 cup granulated sugar
1 large egg and 1 egg yolk
2 tsp vanilla
1/2 cup pumpkin butter*
2 1/2 cups all purpose flour
3 tbsp corn starch
1/2 tsp baking soda
1/4 tsp salt
1 tbsp pumpkin pie spice
1 1/4 cup of mixed mini chocolate chips and regular

*Pumpkin butter can be hard to find and can be expensive when you do find it. Check out the original recipe for a 2nd recipe that is similar that uses pumpkin puree.

Here's what you do...

1. Preheat oven to 325.

2. Combine flour, cornstarch, baking soda, salt, and pumpkin pie spice in a bowl. Set aside.


3. In a larger bowl, combine butter and both sugars. Then, add egg, egg yolk and vanilla. Stir. Then add pumpkin butter and stir.

4. Slowly add your flour mixture to your butter/sugar mixture. It is a THICK dough, so take it slow and stir frequently.


5. Fold in your chocolate chips.


6. Roll into small balls and place on a parchment paper lined baking sheet. Bake for no longer than 15 minutes. They will look soft - they are supposed to! I learned this the hard way (my first batch was super burned on the bottom!).

7. Take out of the oven, cool, and enjoy!


These smell like fall and taste like fall. Can something taste like fall? I've decided it can.

Happy baking! We went to a food truck festival on Sunday (food trucks = Madeline's idea of an awesome day), and I have a recipe coming later this week inspired by something we ate...stay tuned!