Monday, October 15, 2012

Butternut Squash Mac and Cheese

I told you I was going to inundate you with fall recipes


This. was. so. good. I made this the other night when our neighbors came over for dinner, and it was FANTASTIC.

I used an oven proof skillet so I could do everything in one pan (except cook the shells), but you can definitely use a non-oven safe pan and transfer to a baking dish.

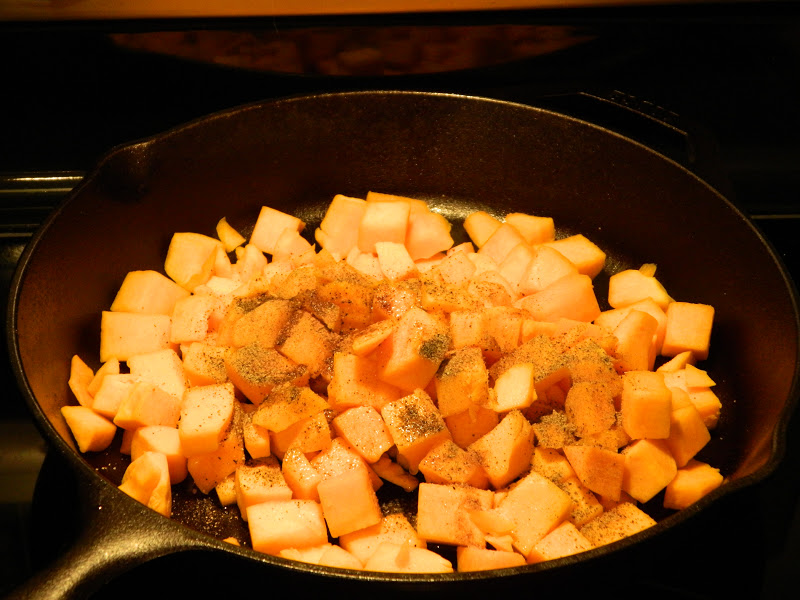
Also, I bought pre-cut butternut squash. I have wrestled with a butternut squash once and almost chopped my hand off. If you want to slice your own squash...go for it. I enjoy having 2 hands.

Here's what you need (from How Sweet Eats)...

4 cups of uncooked whole wheat medium shells
4-5 cups of uncooked butternut squash, cubed
Olive oil
1/2 tsp salt
1/2 tsp pepper
1/4 tsp nutmeg
1 tbsp fresh chopped sage
3/4 cup of low sodium vegetable stock
1 1/2 cups of milk (I used skim)
1 hunk (usually 8 oz.) of fontina cheese, shredded
1/2 cup of fresh shred parmesan
2 tbsp unsalted brown butter*
Bread crumbs

*Brown butter gives a great flavor to food. In a small saucepan, melt your butter and whisk until you start to see brown bits on the bottom of the pan. Immediately take off the heat, whisk for a few more seconds, then set aside until ready to use.

Here's what you do...

1. Preheat oven to 375 degrees.

2. Boil your pasta according to directions and set aside.

3. In your large oven safe/non-oven safe skillet, saute butternut squash with olive oil, salt, pepper, and nutmeg.


4. Add vegetable stock and cover the pan allowing the squash to simmer for about 15 minutes (make sure it's medium-high heat).

5. Once you have done this, you should be able to mash your butternut squash with a potato masher or fork.


6. Add milk, about 3/4 of the fontina, all of the parmesan, and the fresh sage. Stir until smooth and melted, about 5 minutes.


7. Once smooth, add your brown butter. Then, mix in your shells.

8. Transfer to a separate baking dish if you are not using an oven safe skillet, and top with remaining fontina and cover evenly with bread crumbs.


9. Bake for 20-25 minutes and allow to sit for 10 minutes after removing from the oven. Enjoy!

This had such a great flavor. I honestly don't remember what wine I had that night because I was so focused on this dish. Our neighbors brought over a low sodium tomato soup, which was an excellent side dish.

Make this!! Just don't cut off your hand if you decide to be brave and cut the squash yourself. But honestly, you should just pay the extra $1.50 and save yourself a hospital visit.

This promises to make your Monday better :)

Tuesday, October 9, 2012

Fig and Goat Cheese Appetizer

This appetizer could fall into two categories: "things that don't look terribly appetizing, but taste awesome," and "things that look a lot more fancy than they really are."


A few weeks ago, my neighbor and friend Beth came by with a couple samples of appetizers she was making for her in-laws. One of the appetizers was figs on a cracker with creme fraiche. I'm not a huge creme fraiche fan, but the figs were AWESOME. As you all know, we have plenty of goat cheese, so...ta da! 


The savory/sweet combo of the figs and goat cheese is so good. I highly recommend making this the next time you volunteer to bring an appetizer to an event or dinner a friend's house. They will be impressed and thing you spent loads of time and/or money on this. And you will have spent barely any time and about $5. 

Here's what you need (thanks, Beth!)...

8-12 figs, cut into fourths
Goat cheese
Cracker of choice
1-1 1/2 tbsp of sugar
1/4 cup of water

Here's what you do...

1. Cut the stems off your figs, cut them into fourths, and put them in a small saucepan. Add water (it shouldn't completely cover the figs - just go up about halfway) and sugar. 


2. Turn heat to high, bring to a boil, then lower the heat and let simmer until the water/sugar/fig mixture is reduced. About 10 minutes. It should look like this:


3. Spread goat cheese on crackers, top with the figs, and enjoy!


Simple, relatively cheap, and really really tasty. 

We had this with a glass of Pinot Grigio from...Costco. 


Costco's brand (Kirkland) makes some GREAT wines, and they are always reasonably priced. Not super dry and a little fruity, it went really well with this appetizer.

Have a great week!

Friday, October 5, 2012

Apple Pie Cakes

Happy Fall!! It officially feels like fall in North Carolina, so get ready for more fall recipes than you can handle. If Justin can find butternut squash in bulk (and I have no doubt he can), we will be buying it.


I was craving something sweet the other night, but I didn't want to go overboard. My birthday is this weekend, and I know cake will be happening, so I didn't want to make anything super sugary/bad for me. So, these happened.

I know, they are adorable (I find it weird when people describe food like this, but really, look at those hearts). I bought those ramekins online a few weeks ago and finally found a reason for them. If you don't have ramekins, just use a small baking dish.


This recipe is small - it does not yield a lot of cake, which is exactly what I wanted. I just wanted one small serving. BUT if you want a big cake, double or even triple it and put it in a bigger baking dish.

Here's what you need (from How Sweet Eats):

1/4 cup butter, melted
1/4 cup brown sugar
1 egg
2 teaspoons of vanilla
1/3 cup of plain greek yogurt (I used fat free Fage)
1/3 cup of whole wheat pastry flour
1/4 cup of all purpose flour
1 tsp baking powder
1/2 tsp cinnamon
pinch of ginger and nutmeg
1 apple, peeled and cut into small pieces

For the brown sugar topping:

1 tbsp brown sugar
1/2 tbsp flour
1/4 tsp cinnamon
2 tsp melted butter
pinch of salt

Combine and sprinkle over batter just before baking.


Here's what you do...

1. Preheat oven to 350 degrees.

2. Combine butter, brown sugar, egg, vanilla and greek yogurt in a bowl and stir to combine. You don't even need a hand mixer - just a spatula!

3. In another bowl, combine the flours, baking soda, cinnamon, ginger and nutmeg and mix to combine.

4. Add your dry ingredients to your batter and stir again to combine. Then, fold in your apple pieces. Sprinkle your brown sugar topping on top.

5. Pour into individual ramekins (it made 3 for me), or into a baking dish of choice. Bake for 25-30 minutes, or until a toothpick comes out of the center clean.

6. Allow to cool. If you wish, add a glaze on top. You just need 3 tbsp of powdered sugar combine with a little splash (emphasis on little) of milk. Pour on top of your cake. Enjoy!!


These satisfied my craving for something sweet without being overly sweet. And I didn't feel guilty afterward because it was a small portion! Win win.

*I should note - I made a comment in my last post about being healthy not being fun. I simply meant that it is sometimes a struggle to be healthy. When you crave a bacon cheeseburger, but know you should eat a salad instead, it's not always as satisfying. BUT, I am always satisfied by the way I feel when I eat healthy.

Have a wonderful weekend everyone!! Now that I'm looking at that picture I'm thinking some vanilla ice cream would have been a perfect addition...